Sunlight

Sunlight
Showing posts with label All-Nite Grill. Show all posts

Sunday, March 4, 2012

Completion of Diner

I had been putting off completing my diner because of my apprehension in bending the aluminum tube.  This tube would serve the purpose as a footrest for the diner patrons sitting at the counter.  Earlier this year I blogged about my tube bender issues, and this weekend finally got up enough courage to use it. 

I decided to take small steps in getting it bent.  The tube bender instructions mentioned heating the tube and then bending it.  Once the tube is bent to meet your specifications you’re to submerge it in cold water.  I filled a large tub that I use for hand washing with cold water.  Then plugged in my hair dryer.  With the tube inside the tube bender, I aimed the hair dryer at the specific point where I wanted to bend it.  I tried bending it many times, but was unsuccessful in getting it bent.  My husband suggested heating the tube with the hair dryer and then bending it against the kitchen counter. This didn’t work, so my husband very kindly took over.  At last, we resorted to heating the tube sans tube bender over the gas burner of our stove.  Heating it over fire turned out to work better than the hair dryer.  My husband was then able to bend the tube with the tube bender while wearing winter gloves, to protect his hands from the heat. 

There was still more bending to be done, and I suggested using vice grips on the tube encased in the tube bender, which worked out really well.   When the tube was bent to the proper curvature, it needed to be cut down to fit around the counter. 

My husband and I discussed what to cut the tube with.  We came to the conclusion to use my dremel with one of its cutting wheels.  Then came the task of finding a way to mount the tube to safely cut it.  Neither one of us owns a vice, which would’ve been really useful in cutting the tube.  My husband went through his pieces of scrap wood and found some large pieces that could be clamped together with the tube sandwiched in between.  It seemed like a great idea but it had one minor flaw, our largest clamp was just a hair too small to fit around the tube and wood scraps.  Another search through the wood scraps turned up two thinner pieces that could be successfully clamped with the tube in between.  We rested this on top of a large block of wood on our kitchen floor.  I tried cutting the tube while my husband stood on our make shift vice, but was only successful in making a few dents in the tube that seemed to resemble small scars rather than anything else.  Just a note for those of you sitting in the comfort of your home reading this post-yes, I was wearing safety goggles.  The torque of the dremel was too much for me to successfully cut through the tube, so my husband took control of cutting the tube.  He wore safety goggles while cutting and I waited in the next room.

Installing the tube on the counter

The next day, was the day to finish up the diner project.  I cut up and glued small pieces of foam core board to the reverse side of the counter so that it would have shelves.
 I already had wire that would be used to affix the tube to the sides of the counter.  Kath Dalmeny’s, Dollhouse Style mentions using thin pieces of silver cardboard or strips of aluminum.  I didn’t have the aluminum strip and didn’t want to deal with the hassle of trying to superglue tiny pieces of cardboard to the tubing, so I opted for using gray colored wire instead.

I twisted a small part of the wire securely around the tube and then cut away the excess.  Then I repeated this process in increments along the piece of tubing.  In total there were 5 pieces of wire that were twisted around the tube.  Next came attaching it to the counter.  The directions in the book never say how far from the bottom of the counter to affix the tubing, so I had to make a guess.  Hopefully, if the publishers of Ms. Dalmeny’s book decide to make another edition or printing, the instructions for installing the tubing around the base of the counter will be more specific. 

At first, I poked holes in the sides of the counter about 5-10mm from the bottom of the counter with the pointed part of a safety pin.  I tried to poke the twisted wire through the hole made with the safety pin, but couldn’t get the wire through.  I tried widening the hole with the pin, but to no avail.  I have a very small hand drill that I used to increase the hole made with the pin.  This made a larger hole and the twisted wire fit through it.  At each point where the wire would go through the sides of the counter, I used the safety pin and then the small drill to make the hole large enough for the other pieces of wire. 

When I had it all attached to the counter, I discovered that my tube was a bit too long at the curved end of the counter.  I considered removing the tube to cut it, but really didn’t want to deal with the hassle.  Instead, I opted to take a pair of vice grips to the overhanging end and bent it back around the counter.  This wound up working really well, I did have to realign the tube—but it wasn’t a crisis.  I glued the pieces of wire some more on the backside of the counter and then let it dry for a bit.

Signage Creation

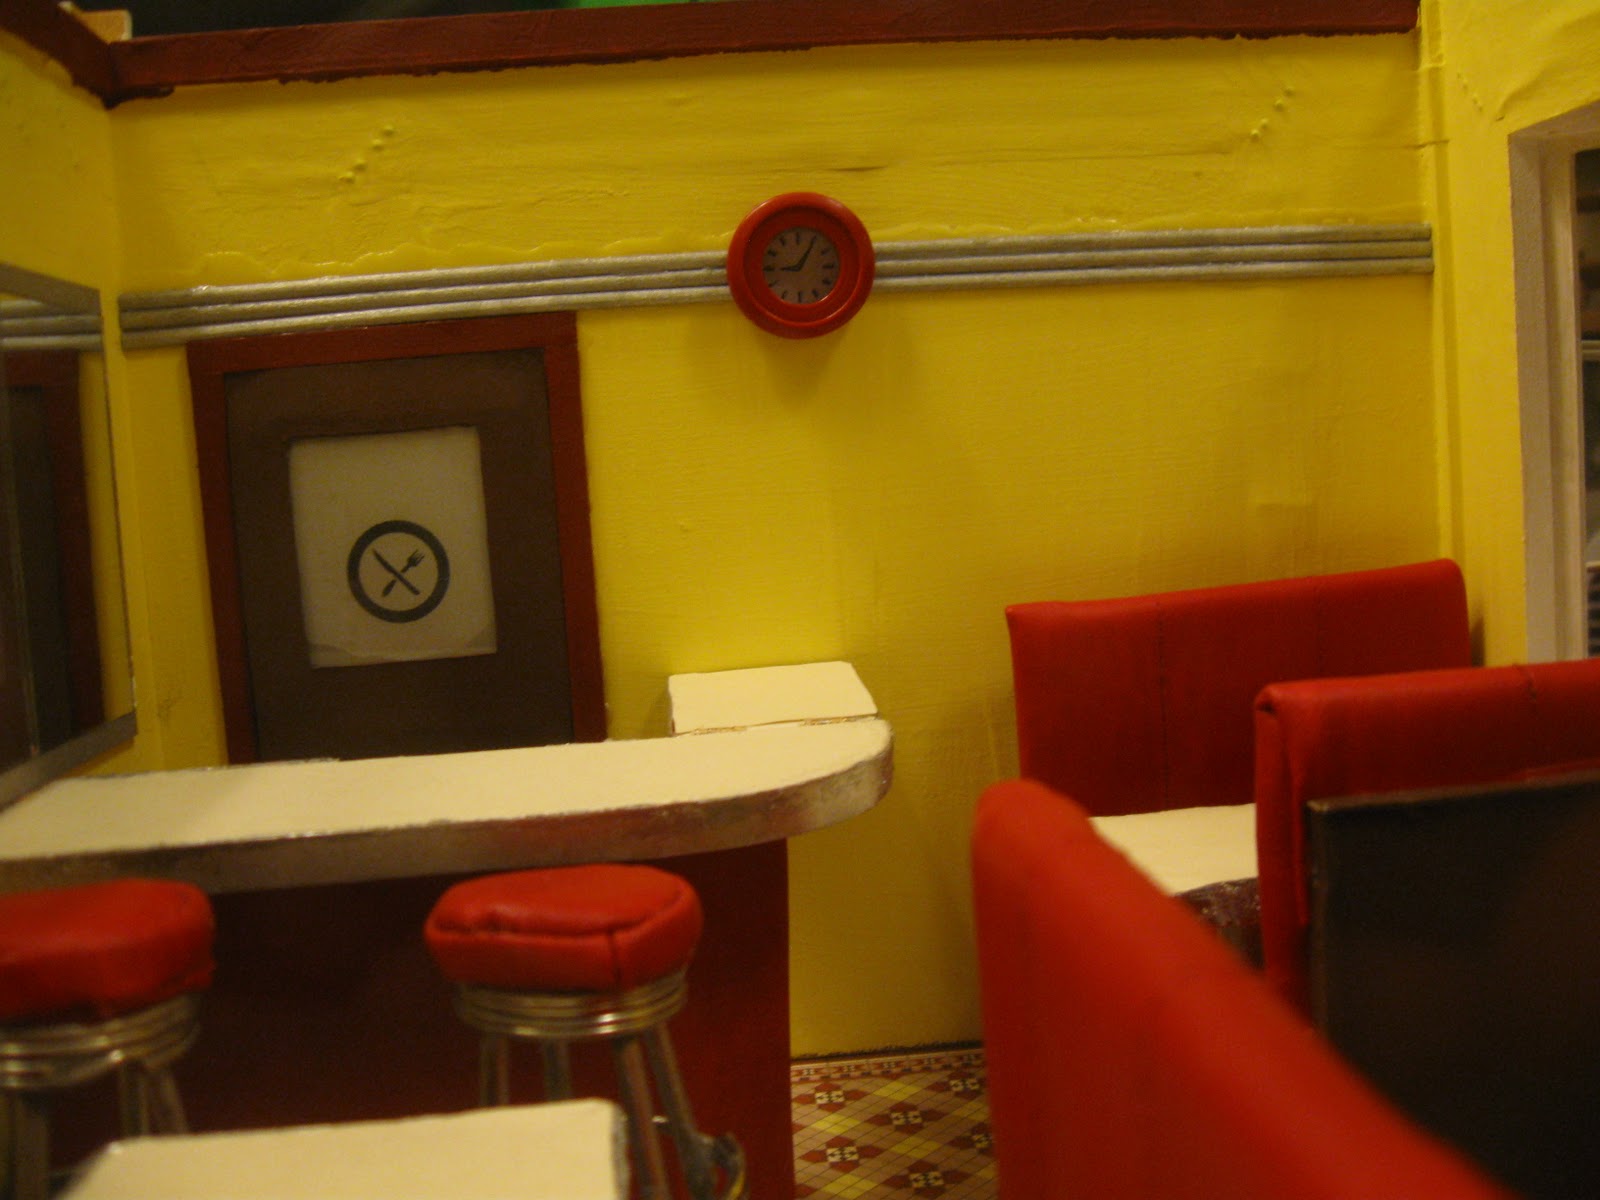
While waiting for the counter to dry, I made signage for the diner.  I had painted the surface of an oval shaped sign with white acrylic paint.  There are 3 trim pieces that fit in between the top edge of the walls and the top section or roof of the diner. A couple of these trim pieces had square area that I could envision painted white and have the diner’s name on them.  I painted a square of white acrylic paint to these sections.  The smaller third trim section would have a clock face on it.  When I was planning the diner, I bought a small clock face from my local miniature store.  I glued pieces of Velcro to this trim and to the back of the clock face.  The clock runs on a battery and I wanted to be able to easily change the battery, attaching the clock with Velcro seemed to be my best option.

Previously, I had experimented with different fonts on my word processor.  I found one that would work really well for my diner.  Several years ago, I had made a sign for another miniature store by printing the shop’s name on a clear label that I cut down to fit the sign and stuck onto the sign.  This time I did pretty much the same thing.  I tested out different sizes of the diner’s name in the font I had chosen before printing it on the labels. After printing out the labels, I set them aside to dry and returned to other aspects of completing my diner.

Once the counter was dry, I glued it to the floor with tacky glue.  Then I noticed that the stools were too tall for the counter.  I used my easy cutter tool to cut the stool legs so that they would be shorter and more to scale.  To test out and make sure that I had the stools were the proper height, I set a miniature doll on the stool.  She seemed to be the right height for the counter, and so I knew that I had cut the stool’s legs correctly.
With the counter glued down and the stools now the correct height, I returned to creating my diner signage.  I cut out around the diner’s name from the clear label.  Then I separated the paper backing from the label and stuck it onto my sign.  I did this for each of my signs.


At last, I put the roof on my diner and then inserted each of the trim pieces around it to hold everything in place.  I set on a shelf and then plugged it in and sat back to enjoy my hard work.

Saturday, January 14, 2012

All-Nite Grill Decorating Redux

Mirror, Mirror

I mentioned previously that I wanted to have mirrors covering one of the diner’s walls.  I had bought a few small mirrors at A.C. Moore a long time ago and had toyed with the idea of cutting one of these down to size so that there would be a continuous line of the along one wall.  Because cutting the piece of Plexiglas with my special cutter had worked so well, and after having read up on glass cutting I thought that I would it a try. 

The plan was to have a silver painted narrow strip of wood at the top and bottom of the mirrors.  I couldn’t find a piece of wood strip to fit my needs.  So I took one that I cut to the right length to fit along the wall and then cut in half lengthwise.  I really wanted to paint it with metallic silver model paint, but I didn’t want to deal with the fumes and needing to have the windows open on a cold winter day.  Instead I used metallic silver acrylic paint.

I glued one of the pieces to the wall just behind the booth.  Then I glued the small mirrors in a line until I ran out of space for a complete mirror.  I held the small mirror over the empty space and drew a mark on it so I would know how narrow to cut it.  Next, I placed it face down on my desk and using the mark as a guide, drew a line all the way across.  I placed a strip of masking tape along the line I’d drawn and then put on safety goggles and gloves.  I started cutting along one side of the masking tape with my plasticutter tool.

As I continually cut along the same line, I noticed that all that seemed to be happening was that I was scraping off the silver backing from the mirror in a thin line and wasn’t really cutting into the mirror itself.  There was a cut in the glass, but it wasn’t too deep.  When I cut the Plexiglas, I had scored it and then was able to snap it apart.  I tried this with the mirror and instead of a clean break it splintered a bit.  The piece that I had been trying to cut away from the mirror was streaked on the lower portion with scratches so it was unusable.  It was disappointing that this didn’t work.  I decided to trim the silver wood strip so it was flush with the last mirror on the wall.  I trimmed the second piece of wood strip to the same length and glued this in place above the line of mirrors.

Making the clock

In Kath Dalmeny’s book it shows a clock on the wall and includes an image of the clock face that one could use in their diner.  I wanted to use the clock face, but wanted to use an old piece of a key chain of my husband’s.  The piece is round and a bit smaller than the book’s clock, so I knew that I would need to make adjustments. 

To start, I chose a half round piece of wood strip and cut it into the three pieces.  I painted each of these with metallic silver acrylic paint.  When the paint was dry, I glued them one by one to the wall over the fake door.

While waiting for the glue to dry, I took the image file of the clock face and put this into my photo editor program to shrink it down.  For whatever reason this program doesn’t allow me to print, so I put the image file into Paint and then printed it.  I had to adjust the size and print out the image a couple of times before getting the right size that would fit the key chain piece. 

Once I had the right size printed out, I cut a piece of thin cardboard and glued the clock face to this.  I then centered the key chain piece onto the clock face and glued it in place.  I set this aside to dry a bit before gluing onto the silver half rounds on the wall.

Diner from Dollhouse Style

Friday, January 13, 2012

All-Nite Grill Decorating

Making the fake door

I wanted to have a door behind the counter that would lead to an unseen kitchen.  Not wanting to deal with the expense of purchasing this said door, I decided to make one.  I knew that I wanted a window in the door that I could put the picture of the knife and fork symbol that is shown in Kath Dalmeny’s Dollhouse Style.  The color scheme I decided on for the door was brown and then the molding around it would be maroon. 

I measured the height of the front door to the diner and then put the counter in place and measured the width of the area to obtain the size I wanted for my door.  I took a piece of thin cardboard from a cereal box and then measured out the size I had decided on.  I cut this out.  Then I needed to come to a decision on the size of the window in the door.  I drew a couple of different sized rectangles on the door piece before coming to one that suited my needs. 

After cutting out the window from the door piece, I painted it with brown acrylic paint.  Next I cut out a piece of thin cardboard to use as the grey/silver wall piece that would show through the window.  I painted this with several coats of silver metallic acrylic paint.  I tested the fit of the silver wall piece once both sections were completely dry.  The window ‘glass’ that I wanted to use has a hazy glaze to it.  It’s actually a small piece of non-glare plexi glass.  I cut this down to size with a plexi glasscutter while wearing safety goggles. 

Previously I had scanned the page from Dollhouse Style that has a picture of the knife and fork symbol and a clock face that I want to use for this project as well.  I manipulated the symbol with my husband’s help in a photo-editing program.  I needed to make the background of the symbol transparent so it could be printed onto a clear label.  Once the symbol was printed out, I set it aside for a couple of days so the ink could dry.

After it was dry, I cut away just enough of the clear label so that it could just be put on the window ‘glass’ without a line being visible around it.  Then I glued the ‘glass’ to the backside of the door and let it dry.  After the glue had dried, I glued the silver wall piece to the backside of the door’s window and after that section had dried, I glued it to the wall behind the counter. 

The next step was to make the molding around the door, paint it and glue in place.  I cut out three sections of thin cardboard that would fit around the door.  These I glued together to form the door’s molding.  When it was dry, I painted it with maroon acrylic paint.  After the paint dried, the molding was glued in place around the door.

Making the table posts

Next on my list of things to do with the diner was to make the table posts.  In Kath Dalmeny’s book, she mentions using buttons painted silver as the base for the posts or table legs.  The posts are really dowels painted with silver metallic paint. 

I wasn’t interested in using buttons.  Frequently miniature books mention using things like buttons and jewelry findings to make miniature things, as though everyone has such things just lying around their house.  I don’t have a huge quantity of buttons that I’m willing to surrender to my latest miniature project.  I also don’t have random jewelry findings floating around my home either.  It’d be nice if someone wrote a miniature book about items that people actually do have in their house.  I’ll get off my soapbox now.

Since I didn’t want to use buttons, I had decided to use washers instead of the buttons.  My husband had gotten me the washers for Christmas one year.  I cut the dowels to the correct length with my razor saw and miter box.  Then I glued the cut dowel lengths to the washers with Tacky glue.  When the glue was dry, I painted the dowels with silver metallic paint.

Painting the interior cornice trim

While deciding on my next step, I noticed that the cornice molding in the diner needed to be painted.  I had toyed with the idea of somehow covering that area with lighting.  There’s already a light fixture in the diner, so I don’t really need to put lights on the molding.

I decided to paint the molding with maroon acrylic paint.  I tore off long pieces of masking tape and placed these around the edges of the molding to keep paint from getting onto to the walls and then painted the molding with one coat of paint.

When the paint was dry, I removed the masking tape and was left with nicely painted cornice molding.

Installing LED lighting strip

A few years ago the Hobby Builder’s Supply catalog began selling LED lighting.  They sell a strip of LED lights that will stick onto pretty much any surface.  When I saw this being sold, I thought immediately of my diner.  This Christmas, I put these lights on my Christmas list, and sure enough Santa gave them to me. 

As I mentioned earlier, the diner already has lights in it.  However, my plan was to install the strip of LED lights and remove the one lighting fixture that I had installed.  When I got the lights, I read the installation directions.  It said to affix the lighting strip to the positive side of the tape wire run with brass eyelets. 

Unfortunately, I’m not one for using eyelets in my electrical runs.  I’m more of a brass brads type of gal.  I was apprehensive to use something different then what the instructions called for, but came to the conclusion that the worst that would happen is the strip wouldn’t light up.  Most likely the diner wouldn’t burn down.  I removed the paper backing from the LED lighting strip and then affixed to the wall and ran it from the middle of one bay window to the next.  Then I pressed a brass brad at each end on the positive side of the tape wire.  I plugged in my lead-in wire to the junction splice and flipped the switch—and there was light!

The effect of the LED lighting was absolutely wonderful and added to the retro look of the diner.  Definitely worth it!!

After a week or so, I removed the old lighting fixture that I had installed when I initially began to decorate.  It was pretty easy to pull the one wall scone off the wall and then pull out the brads with the wire from the sconce wrapped around them from the wall.  I did need to touch up a few areas with paint after I removed more of the glue that had held the sconce in place.

Gluing booth seats to booth bases

While trying to put the furniture in the diner, I came to a conclusion.  The only way that everything would fit would be if I first glued the booths to the floor and from there glued everything else.  This meant that I would have to glue the booth seat pieces together before going any further.  I glued the seats first to the base carefully positioning the cushion pieces so that the whole unit could be glued flush to a wall.  The seats were of course covered with waxed paper and weighted down with books while the glue dried. 
Once the glue had dried, the backs were glued and positioned to correspond with the seat cushions.  Any glue that wanted to run down the edges was wiped away before it dried.

When the booths were finished I glued the ones that would rest against the back walls of the diner in place first.  Then I placed another booth across from it and tested out the fit of the tables.

Redoing the table tops

After the paint dried on my table posts, I tested out how everything would look together.  I came to the realization that when I had downsized the furniture that would go in my diner that I hadn’t taken into account the tables.  The tables needed to be resized.  I thought that I could just cut off part of the tabletop and then re-glue into place the strip of silver painted cardboard trim.  This I realized wouldn’t work and I also needed to test out various sizes for the tables before settling on the size I would use.  I cut out different sized pieces of cardboard and set them onto the table posts to test the effect.  Finally I decided on a size and then cut two pieces of foam core board to that size.  I cut heavy paper out and glued this to the tables just as I had done before.  In my efforts to salvage something from the original tabletops that I had made, I carefully tore off the silver cardboard trim from around the tables and then glued this in place around my newly sized tabletops.

In my efforts to glue the trim, the silver metallic paint became marred.  I tried to paint over this and touch it up in areas.  This worked but in the process I also got paint onto the tabletops surface as well.  I also tried to touch up areas of the trim surrounding the counter with similar results.  Some of the paint could be scraped off carefully with an
X-acto knife, but other areas the paint was a permanent fixture. 

To solve this problem, I cut out pieces of the heavy paper again and glued this to the tabletop’s surface.  I cut away any excess or pressed it down between the trim and the foam core board.

With the tabletops restored, I then glued the other booths to the floor across from their mate.  Gluing the table posts in place was next and was quickly followed up by gluing the tabletops to the posts.

Making the stools

I already made one stool cushion.  With the booths and tables in place I could return to the difficult task of making the second stool cushion.  For some reason, sewing the pieces together by hand went a bit faster than before.  The second cushion appeared to be a bit thicker than the first, but oh well. 

The next step was to glue two key rings together.  Kath Dalmeny’s book says to use super glue for this task.  I don’t have much experience with super glue and actually have almost an irrational fear of it.  I tried using Tacky glue to glue the key rings together, but it didn’t work.  So know I realized that the super glue was my only option.

My husband suggested wearing latex gloves when working with the super glue.  I took his advice.  Using the super glue on the key rings worked out nicely. 

I had previously painted some lengths of thin dowel with silver paint and cut them to the size I needed.  These were glued to the underside of the key ring and cushion combo with super glue.  This was pretty tedious and some of the dowels just didn’t seem to want to stay straight. 

When the dowels had dried in place I glued another larger key ring onto the dowel legs with super glue.  This was even more tedious than the previous gluing task because it was difficult to get the key ring to stay straight.  I used scotch tape to hold the key ring in place on the dowels.  This seemed to do the trick, but I found that when I removed the tape I was left with dried clumps of super glue in places.  So needless to say it didn’t look too great.

I tried to remedy the situation by taking nail polish remover to the glue globs.  This worked to remove the glue in some spots, but also had the undesired effect of reactivating the super glue—good thing I was wearing gloves!  In one instance the key ring came off of the dowels completely and had to be re-glued in place again.  I didn’t use scotch tape to keep it straight and so it wound up being a bit askew. 
The condition of the stools did bother me at the beginning, but I realized that I needed to get rid of my feelings that everything must be perfect.  I put the stools in the diner in front of the counter and other than being a little tall (which can be remedied) they look wonderful and the glue issues aren’t that noticeable.

Tube Bender issues
I have a length of aluminum tube that will need to be curved to fit around the lower part of the counter to act as a footrest.  I had no idea how to go about bending it, but thought that I might heat it up and then try to bend it. 

One of the gifts I received at Christmas was a book on building 30’s and 40’s style dollhouse furniture.  The book mentions using a tube bender as a tool to make some of the furnishings.  I had never heard of a tube bender.  My husband located a hobby shop, called Hobby Works that’s some distance from where we live and said that according to their website they carried it.  The day after Christmas, I called the store and asked if they had a tube bender.  The really nice man on the phone said that he would have one sent over from another location.  I gave him my name and number and he said he would contact me when it came in.  A few days went by and I didn’t receive a call, so I called again. 

This time I talked to a pretty surly man who said that they had never carried tube benders and that if I wanted it I would have to come to the store and special order it.  I found this whole episode to be a bit strange and decided to find it online.  I bought it from a store called Hobbylinc.  The cost was under $3 for the tube bender.  This didn’t include shipping and handling, but at least I wouldn’t have to do a lot of driving and deal with a crabby salesperson.

Tuesday, December 27, 2011

Stay-cation Happenings

Even though the holidays are fast approaching, I couldn’t resist working on some of my current pet projects.  Earlier in the month I had attempted to finish making the booths for my diner.  Kath Dalmeny’s book says to affix the booth fabric to the backside of the seats and backs with double-sided tape.  I’ve never used this type of tape, so I bought some and tried it out.  At first, everything seemed to work out great with it.  It held the fabric nicely to the foam core board, but then gravity or physics came into play and the tape wouldn’t hold the fabric in place for an indefinite period of time.  I wasn’t sure if the double-sided tape was only supposed to hold the fabric in place until the backs and seat pieces were glued to the booths.  Perhaps in the U.K. double-sided tape works better keeping things in place than on this side of the pond?  This setback frustrated me, but instead of completely getting bummed out, I decided to think up another way to affix the fabric to back side of the foam core pieces. 

I talked to my husband about my problems with the double-sided tape and he suggested using staples to hold it in place.  This idea seemed like a possible solution, but I wanted to think about it thoroughly before going forward.  I decided to work on other parts of the diner while I considered the staples solution. 

Tile flooring paper
Based on the directions it appeared that I would need to glue the booths and other furniture to the floor.  This meant that I would need a floor to glue these items to.  Years ago I had bought some great tile flooring paper at my favorite and now defunct miniatures store Once Upon A Time. 

Floor pattern on top of mat board
I had made a pattern for the floor awhile ago out of my usual contact paper and brown wrapping paper.  I found a piece of mat board that I used as the base and cut this to the size of my floor pattern.  The flooring paper I had was this wonderful design of red and light yellow squares and triangles with a border around it.  I wanted to implement the border onto the diner’s floor. 
Tile flooring paper glued to mat board base
I decided to cut part of the flooring sheet to match up with the right-angled section of the floor’s pattern.  I then cut away the border from the remainder of the sheet to glue down on top of the borderless sections of the part I had cut.  The tricky part was the angled portion of the floor that would be in front of the door.  The gluing went better than I had anticipated.  Next was to cover with varnish.  I didn’t have much glossy varnish left and wasn’t sure if a glossy floor would work for this project, so I used a matte varnish instead.  The flooring paper had been glued to the mat board base and had dried thoroughly, but I had some minor bubbling of the paper.  The areas where I had glued the border to the paper bubbled some too, but this I expected.  After the first varnish coat dried, the bubbles had strangely disappeared just as they had surprisingly appeared in the first place.  I painted on another varnish coat and some bubbles appeared again but this time they mainly stayed on the glued border pieces.  Once the varnish dried, the bubbles disappeared again.  Unfortunately my floor was also horribly warped by this time too.  There was no way that I could glue it to the MDF base of my diner, so I weighted it down with books to try and flatten it out.

Tile floor with borders glued in place
I waited a couple of days before lifting the weights off my floor and found that it wasn’t as curled, thankfully.  I squeezed a bead of glue all over the unpainted part of the MDF where the floor would go and spread the glue into a thin layer with a plastic card.  I placed the floor onto the glue, covered with waxed paper and then weighted it down with books. 

While waiting for the glue to dry, I took another look at my diner to see what else I needed to deal with before gluing everything down.  Since I would be gluing the furniture to the floor, I’d obviously need to have the walls glued to the base as well so that if necessary I could glue furniture pieces to the diner’s walls.  I hadn’t painted the inside of the diner’s door yet.  The mirror pieces were still attached to the wall with Scotch tape and the other door that I plan to install behind the counter needs to be made and glued in place. 

Painting interior side of door
I painted the inside of the door a nice brown color.  While painting it I noticed a small area of the outside of the door that needed to be touched up.  I went through my paints, but discovered that I had created a unique maroon color for the door’s exterior.  This I mixed up and applied.  I had tried to minimize paint on other parts of the interior by putting strips of masking tape around the front door, but this didn’t completely eliminate paint from getting in unwanted places.  Clean up was quick and fairly easy by using a Q-tip and water on the affected areas. Once the paint was dry, I glued on doorknobs on the exterior and interior sides of the door. 

Next on my list was to apply the silver cardboard to the edges of the counter and tables.  However, I learned that the silver cardboard I had wasn’t long enough for me to cut into strips to be glued around the tables and counter.  I found a larger size piece of cardboard from a cereal box that I used instead.  I already had metallic silver model paint to use.  Based on the warnings on the instructions, I opened windows and turned on my exhaust fan to try to lessen the fumes.  The paint looked great, but I didn’t enjoy working with it because of the smell.  The fumes weren’t so bad if you weren’t up next to the items painting them.  The effect was definitely worth the fumes and having open windows in December.  Perhaps if fumes are something that really bother you, work with this type of paint in the summer when it’s not so uncomfortable having windows open. 

The next step was to glue decorative paper to the front side of the counter.  Again, I spread a Tacky glue into a thin layer and then placed the piece of decorative paper that I’d cut to the approximate size onto the glue.  Using a plastic card, I smoothed the paper down onto the glue-covered cardboard. 

I removed the mirrors that I had taped to the walls of the diner.  I plan to glue them to the walls later and hopefully can come up with a way to have the mirrors stretch across the entire length of the wall.  The mirrors had been up so long that the tape left behind a sticky residue that I tried to remove with Q-tips dipped in water.  This did remove some of the sticky residue, but also removed some of the paint as well.  When the areas dried out, I painted over the affected areas and the wall looks pretty much back to normal.
 
I kept thinking about another remedy to the attaching the fabric to the backside of the booth backs and seats and never came up with any better idea than to use staples.  My husband happened to have some small staples that he agreed to use for the project.  I had measured the depth of the staple’s arms and knew that I would need to trim some length from the arms.  I gathered everything I thought I would need and decided to work with just one of the booth seats to see how it worked out.  I put on safety goggles, since you never know, and I’m not interested in getting small bits of metal stuck in my eye.  I used the cutting part of a pair of needle nose pliers to trim a bit off the staple’s arms and then pressed it into the fabric and then into the foam core board.  Surprisingly, I discovered that this was the solution to my problem.


After stapling all of the fabric to the back side of the booth seats and backs, I set up the booths with the counter in the diner and took photos to test out what the overall effect would be.


I worked on my project more over the Christmas holiday and will post about those happenings soon. 

Sunday, December 4, 2011

Weeknight Projects

Diner's interior
For the past week, I’ve spent a little bit of time each evening working on my diner.  A few years ago I had made the beginnings of the counter and had even gone so far as to cover the front of it with thin cardboard.  The ‘skeletons’ of what will become the booths and tables were made at this time too. 

At that time I had considered covering the booth pieces with stained pieces of wood, but had decided against this because I didn’t want to deal with the wood stain fumes.  The instructions in Kath Dalmeny’s book talk about covering the booth pieces with brown paper.  I didn’t think the brown paper I had available would match the color shown in the book.  What I did have on hand were a couple of small dark brown gift boxes.  I saved these until I was ready to use them to cover the booths. 
Tabletops and counter section drying
after having paper glued to the backside
Over the past week I glued pieces of these dark brown boxes to the foam core booth ‘skeletons’.  Previously I had cut from nice cream-colored heavy paper the tops for the tables and the counter.  The thought of gluing the paper to the curved parts of the counter scared me, so I started off by gluing the paper onto the tops of the counter and the tables.  After this dried, I glued the paper completely to the tabletops and then started gluing it to the counter. 

Counter with heavy paper glued on top
  I was still bothered by the curved part of the   counter, so I glued the straight areas first to   build my confidence.  I had done some gluing   of fabric to curved pieces of wood and it was   always a difficult and messy process. 


Gluing the paper to curved
section of counter
I cut triangular pieces out of the edge of the paper when I began gluing the paper to the counter’s curved edge.  Little by little I glued these triangular edges to the underside of the counter.  This process worked out very well for me and as the counter’s creamy-colored surface began to take shape, my confidence in the project grew.
Gluing straight edges to counter's underside 


When I first began to make the counter and other furniture for the diner I knew I wanted to copy the items that Ms. Dalmeny makes for the diner in her book, Dollhouse Style.  However, when it actually came to making the furniture for this scene I found that I had a space issue.  The shop that I decided would be made into a diner is too small to accommodate the dimensions of the furniture that are illustrated in her book. 

Upon realization of this I decided to use it more as inspiration for my project.  I scaled down the counter’s size and then made booths and tables out of Lego to test out the sizing of those items coupled with the counter.  This turned out to be a great way to get an idea of how the diner would look when finished. 

I then transferred those measurements of the Lego made booths and tables into foam core board pieces, which I glued together to form the ‘skeletons’ for the booths.

When I first designed my counter I realized that it wouldn’t be able to be a freestanding object.  The plan is to have one end next to a wall.  The other end will be hinged to add an element of realism in that whomever is working the counter will be able to move from behind the counter out to the tables.  The plan is to put a door behind the counter.  This won’t be a working door and will only be there to hint that there is a kitchen behind the door.


Cut pieces of foam core board will be used as booth seats and backs.  Working on this project has spread to the weekend.  Saturday was spent cutting batting and vinyl fabric to the proper size to use for the booths and stools.  The batting was then sewn using a sewing machine to the wrong side of the vinyl fabric and I began to sew the stool cushion pieces together.  I tried to sew the pieces for the stool cushion on the sewing machine, but unfortunately found that this wasn't possible because of the pieces were too small.  I only cut enough fabric pieces for two stools.  I think that I may only have room around the counter for two stools.

I sewed a cushion for one stool today by hand.  I made the small circle of cardboard to go inside as Ms. Dalmeny suggests and put a couple of pieces of foam circles inside and then sewed it up.  What was difficult was that it wasn’t until I trimmed the seam allowances that everything fit inside.  It would’ve been nice if that had been mentioned in the book.

After covering the countertop and extended counter section with heavy paper, I hinged the sections together.  The hinges were first glued to the edges and then the tiny nails were sunk into the foam core board.  This will all be reinforced with glue to keep the nails from coming out.  I found a piece of mat board that will work for the floor.  On a shopping trip to my beloved local miniatures store, Once Upon A Time, I purchased flooring paper that I’ll use in the diner.  My hope is to arrange the pieces so that border around the outside edge is continuous.  Since flooring is the last thing that I do when creating one of my miniature projects, it will take awhile to see if this actually will work out.

Sewing the stool’s cushion takes a lot of work.  I took a break from it by gluing the booths’ foam core board seats and backs to the coverings for the booths.  I weighed these all down with books after covering with waxed paper.